Blender Reference Manual
Getting Started
About Blender
- Introduction
- Who uses Blender?
- Key Features
You can download the latest version of Blender here.
This manual is a good start though it serves more as a reference. There are also many online video tutorials from specialized websites, and several books and training DVDs available in the Blender Store and on the Blender Cloud.
- Blender's History
- Versino/Revision Milestones
Installing Blender
Configuring directories
- LOCAL : Location of configuration and run-time data (for self-contained bundle)
- USER : Location of configuration files (normally in the user's home directory)
- SYSTEM : Location of run-time data for system wide installation (may be read-only)
User interface

The Default Screen
- the info Editor at the top
- A Large 3D View
- A timeline at the bottom
- An outliner at the top right
- A Properties Editor at the bottom right
User Interface Principles
- Non-Overlapping : The UI is designed to allow you to view all relevant options and tools at a glance without pushing or dragging editors around
- Non-Blocking : Tools and interface options do not block the user from any other parts of Blender. Blender typically does not use pop-up boxes (requiring users to fill in data before running an operation)
- Non-Modal Tools : Tools can be accessed efficiently without taking time to select between different tools. Many tools use consistent and predictable, mouse and keyboard actions for interaction.
Customizatino
Blender also makes heavy use of keyboard shortcuts to speed up work. These can also be customized in the Keymap Editor.
Screens
Default Screens

- 3D View Full : A Full screen 3D View, used to preview your screen
- Animation : Making actors and other objects move about, change shape or color, etc
- Compositing : Combining different parts of a scene (e.g. background, actors, special effects) and filter them (e.g. color correction).
- Default : The default layout used by Blender for new files. Useful for modeling new objects
- Game Logic : Planning and programming of games within Blender
- Motion Tracking : Used for motion tracking with the Movie Clip editor
- Scripting : Documenting your work and/or writing custom scripts to automate Blender.
- UV Editing : Flattening a projection of an object mesh in 2D to control how a texture maps to the surface.
- Video Editing : Cutting and editing of animation sequences.
Save and Override
Additional Layouts
- Modeling : Four 3D View(top, front, side and perspective), Properties editor for Editing.
- Lighting : 3D Views for moving lights, UV/Image editor for displaying Render Result, Properties editor for rendering and lamp properties and controls.
- Materials : Properties editor for Material settings, 3D View for selecting objects, Outliner, Library script (if used), Node Editor (if using Node-based materials)
- Painting : UV/Image Editor for texture painting image, 3D View for painting directly on object in UV Face Select mode, three mini-3D Views down the side that have background reference pictures set to full strength, Properties editor.
Areas
The area your mouse is currently hovering over is the one that will be maximized using the keyboard shortcuts.
Menu: View ‣ Toggle Fullscreen Area
Hotkey: Alt-F10
Regions
Tabs & Panels

Buttons
Pie Menus
A pie menu is a menu whose items are spread radially around the mouse. Pie menus have to be activated in the User Preferences through Add-ones > UI > Pie Menus Official.
Toggle & Radio Buttons
Number Buttons
Eyedropper
The eyedropper (pipette icon) allows you to sample from anywhere in the Blender window. They eyedropper can be used to select different kinds of data:
- Color : This is the most common usage.
- Color Ramp : Dragging the cursor over the window to sample a line which is converted into a color ramp.
- Objects/Object-Data : this is used with object buttons (such as parent, constraints or modifiers) to select an object from the 3D View.
- Camera Depth : Number buttons effecting distance can also use the eyedropper.
This is used to set the camera's depth of field so the depth chosen is in focus.
Ewill activate the eyedropper while hovering over a button.LMBdragging will mix the colors you drag over, which can help when sampling noisy imagery.Spacebarresets and starts mixing the colors again.
Data-Block menu
List Views & Presets
Color Picker
Shortcuts
Ctrl-LMB(drag) snaps to hue.Shift-LMB(drag) precision motion.Wheeladjust the brightness.Backspacereset the value.
Color Ramp Widget
Shortcuts
LMB(drag) moves colors.Ctrl-LMB(click) add a new control point.
Curve Widget
Operator Search
A pop-up menu with access to all Blender tools is available by pressing Spacebar. Simply start typing the name of the tool you want to refine the list. When the list is sufficiently narrowed, LMB on the desired tool or navigate with Down and Up, activate it by pressing Return.

Common shortcuts
Mouse
Hovering
While hovering (when the cursor is held over a button).
Properties
Ctrl-C: Copy the (single) value of the buttonCtrl-V: Paste the (single) value of the buttonCtrl-Alt-C: Copy the entire vector or color of the buttonCtrl-Alt-V: Paste the entire vector or color of the button.RMB- Open the context menu.Backspace: Clear the value (sets to zero or clears a text field).Minus: negate number values (multiply by -1.0)Ctrl-Wheel: Change the value incremental steps.
For pop-up options menus buttons, this cycles the value.
Return: Activates menus or toggles the value.Alt: Hold while editing values to apply the change to all selected items (object, bones, sequence-strips).
This can be used for number buttons and toggles.
Animation
I: Insert a keyframeAlt-I: Clear the keyframeShift-Alt-I: Clear all keyframes (removing all F-Curves)Ctrl-D: Assign a driver.Ctrl-Alt-D: clear the driver.K: Add a keying set.Alt-K: Clear the Keying Set.
Python Scripting
Ctrl-C: Over any Operation Buttons copies their Python command into the clipboard.Shift-Ctrl-C: Over property buttons copies their data path for this property (also available from the context menu).Shift-Ctrl-Alt-C: Over property buttons copies their full data path for the data-block and property.
Dragging
Ctrl: While dragging snap the discrete steps.Shift: Give precision control over the valueShift-Ctrl: Precise snap will move the object with high precision along with the snapping constraint
Undo & Redo
- Undo : Ctrl-Z
- Redo : Shift-Ctrl-Z
- Redo Last : F6
- Undo History : Ctrl-Alt-Z
- Repeat Last : Shift-R
- Repeat history : F3
Opertations using Redo
Some operations produce particularly useful result if you tweak their parameters with the F6 Menu. Take, for example, adding a Circle. if you reduce the Vertex count to three, you get a perfect equilateral triangle.
Blender uses two separate histories, one dedicated for the Edit Mode, and one dedicated for the Object mode
When you quit Blender, the complete list of user actions will be lost, even if you save your file before quitting.
Troubleshooting section on Recovering you lost work
Ruler & Protractor
Mode: All Modes
Menu: Tool Shelf ‣ Grease Pencil ‣ Tools:Ruler/Protractor

Usage
Here are common steps for using the ruler:
- Activate the Ruler from the Tool Shelf.
- Click and drag in the viewport to define the initial start/end point for the ruler.
- Orbit the view and click on either end of the ruler to re-position it. Holding
Ctrlenables snap to elements. - Click on the middle to measure angles.
- Press
Returnto store the ruler for later use orEscto cancel
Shortcuts
- Ctrl-LMB : Adds new ruler.
- LMB : Drag end points to place them, hold Ctrl to snap, hold Shift to measure thickness.
- LMB : Drag the center point to measure angles, drag out of the view to convert back to a ruler.
- Delete : Deletes the ruler.
- Ctrl-C : Copies the rulers value to the clipboard.
- Esc : Exit tool.
- Return : Saves the rulers for the next time the tool is activated.
Grease Pencil
- Planning animation poses and motion curves.
- Sketching out model topology.
- hand-drawn storyboarding in 3D.
- As director's tool to review shots.
- 2D animations.
Drawing Strokes
Enable the Grease Pencil by clicking Draw, Line, Poly or Erase from the Tool Shelf T. A new layer will be automatically added for you to draw on.
Animating Sketches
You can use Grease Pencil to create 2D animations (e.g. in flipbook style) and mixing it with 3D objects and composition
Therefore, it is simple to make a pencil-test/series of animated skethes:
- Go to first relevant frame. Draw.
- Jump to next relevant frame. Draw some more.
- Keep repeating process, and drawing until satisfied.
Grease Pencil mode in the Dope Sheet editor
Editors

3D View
Header

Startup Scene
After closing the splash, the startup scene is displayed in the 3D View if no other blend-file was loaded. A customized startup scene can be saved as a part of the startup file
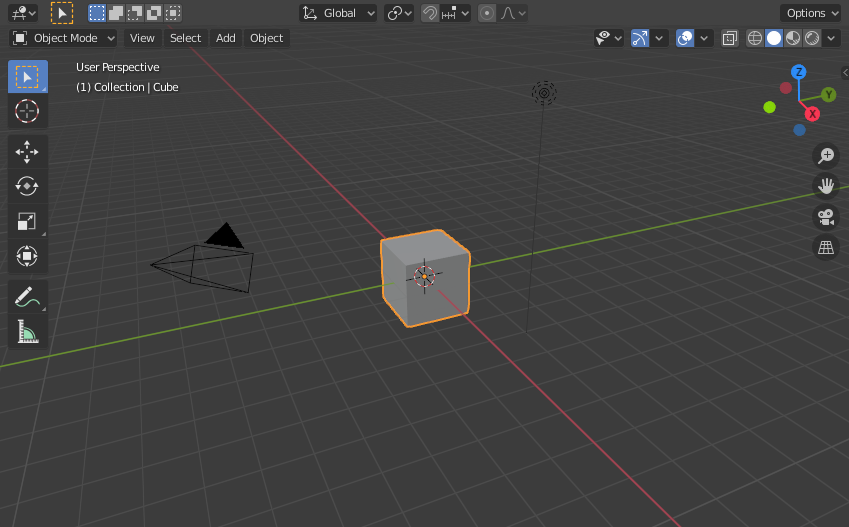
Elements
- Cube
- Lamp
- Camera
- 3D Cursor
- Grid Floor

Object Models
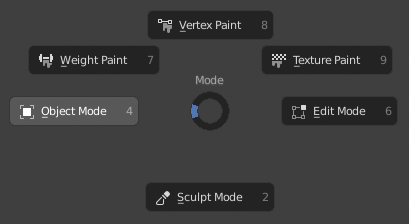
Modes are a Blender-level object-oriented feature, which means that whole Blender application is always in a singular mode, and that the available modes vary depending on the selected active object's type - most of them only enable the default Object mode (like cameras, lamps, etc.). Each mode is designed to edit an aspect of the selected object. See Tab. Blender's modes below for details.
You can only select objects in Object mode. In all others, the current object selection is 'locked' (except, to some extent, with an armature's Pose Mode)
Modes might affect many things in Blender:
- They can modify the panels and/or controls available in some Properties editor tabs.
- They can modify the behavior of the whole editor, like e.g. the UV/Image Editor and 3D View.
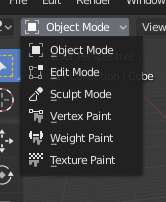
- They can modify the available header tools (menus and/or menu entries, as well as other controls…). For Example, in the 3D view editor, the Object menu in Object Mode changes to a Mesh menu in Edit mode (with an active mesh object!), and a Paint menu in Vertex Paint mode…
modes

Object Mode

Edit Mode

Sculpt mode

Vertex Paint Mode

Weight Paint Mode

Texture Paint Mode

Particle Edit Mode

Pose Mode

Edit strokes Mode
Navigating
Walk/Fly
Aligning
These operators change the view to be aligned with the specified global axes:
- Top
numpad7 - Botton
Ctrl-Numpad7 - Front
Numpad1 - Back
Ctrl-Numpad1 - Right
Numpad3 - Left
Ctrl-Numpad3
Objects
The geometry of a scene is constructed from one or more Objects. These objects can range from lamps to light your scene, basic 2D and 3D shapes to fill it with models, armatures to animate those models, to cameras to take pictures or video of it all.
Instancing
Each Blender object type (mesh, lamp, curve, camera, etc.) is composed from two parts: an Object and Object Data (sometimes abbreviated to obData):
- Object : Holds information about the position, rotation and size of a particular element
- Object Data : Holds everything else, For example:
- Meshes : Store geometry, material list, vertex groups, etc.
- Cameras : Store focal length, depth of field,, sensor size, etc.
Object Types
Reference

Mode:	Object Mode
Panel:	Tool Shelf ‣ Create ‣ Add Primitive
Menu:	Add
Hotkey:	Shift-A
- Mesh
- Curbe
- Surface
- Metaball
- Text
- Armature : Armatures are used for rigging 3D models in order to make them poseable and animateable
- Lattice : Lattices are non-rederable wireframes, commonly used for taking additional control over other objects with help of the Lattice Modifier
- Empty
- Speaker
- Camera
- Lamp
- Force Field : Force Fields are used in physical simulations. They give simulations external forces, creating movement, and are represented in the 3D View editor as small control objects
- Group Instance : Lets you select from a list of existing object groups. Once selected, an Empty object will be created, with an instance of the selected group (group duplication active). See DupliGroup
Common Options
You can change the options of the object in the Operator panel just after creating it:
- Type :
- Radius/Size
- Align to view
- Location
- Rotation
Selecting
Select More/Less
- More
- Less
- Parent
- Child
- Extend Parent
- Extend Child